4 - Radio Button
4.1 Example 1
7_ui_source_codes_serkanCay\3-RadioButton-master\app\src\main\res\layout\activity_main.xml
( Aşağıdaki activity_main.xml dosyasında bir ekranın nasıl görüneceğini belirleriz.
İnceleyelim. Relative layout kullandık, yani hangi element hangi element'in altında
sağında solunda vs. diyerek bir User Interface tasarlayacağız.
Root element'imiz RelativeLayout'dır. Bunun
içerisinde bir TextView element vardır. TextView, read only bir text göstermek
için kullanılır. Textview element'in içerisindeki text'i nasıl belirledik? TextView element'in android:text
attribute'üne bir değer assign ederek.
TextView'in altında RadioGroup element
vardır. RadioGroup element'in android:layout_below attribute'üne değer olarak yukarıda tanımladığımız
textview'in id'sini verdiğimiz için, bu radiogroup ekranda ilgili textview
element'in altında görünecektir.
RadioGroup element, içerisinde 3 tane RadioButton element
vardır. Herbir RadioButton element'i ekranda radioButton diğer bir deyişle
radiobox olarak gösterilecek seçenekleri temsil eder. RadioButton element'lerinin android:id
değerleri sırasıyla mavi, yeşil ve kirmizi'dir. Ayrıca yine bu element'lerin
yanlarında da mavi, yeşil ve kırmızı yazar bunu da element'lerin android:text
attribute'lerini set ederek sağladık.
main_activity.xml dosyasında yazdığımız
ve herbir element'e verdiğimiz id değerlerine dikkat edelim. Herhangi bir Java
dosyasında veya main_activity.xml dosyasında bir view element'e refer etmek
için, örneğin bir butona bir textview'e vs. refer etmek için element'in id
değeri kullanılır. Aşağıdaki main_activity.xml dosyasına bakalım. RadioGroup
element'inin TextView element'inin altında olduğunu söylemek için RadioGroup element'inin layout_below
attribute'üne değer olarak TextView element'inin id'sini vermişiz.
RadioGroup element'inin altında TextView element vardır.
<TextView
android:layout_below="@+id/radioGroup" ... >
Burada
read only olarak "Seçtiğiniz renk : " yazar.
TextView element'inin altında Button element vardır.
<TextView
android:layout_below="@+id/button" ... >
Butonda
"Onayla " yazar. )
<RelativeLayout xmlns:android="http://schemas.android.com/apk/res/android"
xmlns:tools="http://schemas.android.com/tools"
android:layout_width="match_parent"
android:layout_height="match_parent"
android:paddingBottom="@dimen/activity_vertical_margin"
android:paddingLeft="@dimen/activity_horizontal_margin"
android:paddingRight="@dimen/activity_horizontal_margin"
android:paddingTop="@dimen/activity_vertical_margin"
tools:context=".MainActivity">
<TextView
android:id="@+id/textView"
android:layout_width="wrap_content"
android:layout_height="wrap_content"
android:text="Bir renk
seçiniz!"
android:layout_alignParentTop="true"
android:layout_centerHorizontal="true" />
<RadioGroup
android:layout_width="wrap_content"
android:layout_height="wrap_content"
android:layout_marginTop="38dp"
android:id="@+id/radioGroup"
android:layout_below="@+id/textView"
android:layout_centerHorizontal="true">
<RadioButton
android:id="@+id/mavi"
android:layout_width="wrap_content"
android:layout_height="wrap_content"
android:layout_centerHorizontal="true"
android:layout_marginTop="150dp"
android:text="Mavi" />
<RadioButton
android:layout_width="wrap_content"
android:layout_height="wrap_content"
android:id="@+id/yesil"
android:text="Yeşil"/>
<RadioButton
android:layout_width="wrap_content"
android:layout_height="wrap_content"
android:id="@+id/kirmizi"
android:text="Kırmızı"/>
</RadioGroup>
<TextView
android:layout_width="wrap_content"
android:layout_height="wrap_content"
android:text="Seçtiğiniz renk:"
android:id="@+id/textView2"
android:layout_below="@+id/button"
android:layout_centerHorizontal="true"
android:layout_marginTop="86dp" />
<Button
android:layout_width="wrap_content"
android:layout_height="wrap_content"
android:text="Onayla"
android:id="@+id/button"
android:layout_below="@+id/radioGroup"
android:layout_centerHorizontal="true" />
</RelativeLayout>
7_ui_source_codes_serkanCay\3-RadioButton-master\app\src\main\java\
com\serkancay\radiobutton\MainActivity.java
MainActivity.java
dosyasını inceleyelim. ActionBarActivity
class'ını extend eden MainActivity isimli bir class tanımladık. Bu class'da, RadioButton, TextView ve Button
class'ından variable'lar tanımladık. Sonra onCreate() method'unu implement
ettik. setContentView(R.layout.activity_main); diyerek ekranda
activity_main.xml dosyasında belirtilen user interface gösterilir.
Sonra
activity_main.xml dosyasında tanımladığımız element'leri elde ederiz tek tek :
mavi=(RadioButton)findViewById(R.id.mavi);
yesil=(RadioButton)findViewById(R.id.yesil);
kirmizi=(RadioButton)findViewById(R.id.kirmizi);
button=(Button)findViewById(R.id.button);
tv=(TextView)findViewById(R.id.textView2);
main_activity.xml dosyasında tanımlı olan button id'li butona
artık button isimli
variable'ı kullanarak erişebileceğiz. button variable'ının setOnClickListener()
method'unu çağırarak butona bir listener register ederiz. Artık ekrandaki bu
butona basıldığında ne yapılmasını istiyorsak, bu method'un içerisinde yazmalıyız. Bu
butona tıklanıldığında radioButton'lardan hangi seçili diye bakarız ve seçili
olan rengi butonun üzerindeki textview'e yazarız.
button.setOnClickListener(new View.OnClickListener() {
@Override
public void
onClick(View v) {
if(mavi.isChecked()){
tv.setText("Seçtiğiniz
renk: MAVİ");
}else if(yesil.isChecked()){
tv.setText("Seçtiğiniz
renk: YEŞİL");
}else if(kirmizi.isChecked()){
tv.setText("Seçtiğiniz
renk: KIRMIZI");
}else{
Log.i("RADIOHATA", "Seçim
belirlenemedi!");
}
}
});
package com.serkancay.radiobutton;
public class
MainActivity extends ActionBarActivity {
RadioButton mavi,yesil,kirmizi;
TextView tv;
Button button;
@Override
protected void
onCreate(Bundle savedInstanceState) {
super.onCreate(savedInstanceState);
setContentView(R.layout.activity_main);
mavi=(RadioButton)findViewById(R.id.mavi);
yesil=(RadioButton)findViewById(R.id.yesil);
kirmizi=(RadioButton)findViewById(R.id.kirmizi);
button=(Button)findViewById(R.id.button);
tv=(TextView)findViewById(R.id.textView2);
button.setOnClickListener(new View.OnClickListener() {
@Override
public void
onClick(View v) {
if(mavi.isChecked()){
tv.setText("Seçtiğiniz
renk: MAVİ");
}else if(yesil.isChecked()){
tv.setText("Seçtiğiniz
renk: YEŞİL");
}else if(kirmizi.isChecked()){
tv.setText("Seçtiğiniz
renk: KIRMIZI");
}else{
Log.i("RADIOHATA", "Seçim
belirlenemedi!");
}
}
});
}
@Override
public boolean
onCreateOptionsMenu(Menu menu) {
//
Inflate the menu; this adds items to the action bar if it is present.
getMenuInflater().inflate(R.menu.menu_main, menu);
return true;
}
@Override
public boolean
onOptionsItemSelected(MenuItem
item) {
//
Handle action bar item clicks here. The action bar will
//
automatically handle clicks on the Home/Up button, so long
// as
you specify a parent activity in AndroidManifest.xml.
int id = item.getItemId();
//noinspection
SimplifiableIfStatement
if (id == R.id.action_settings) {
return true;
}
return super.onOptionsItemSelected(item);
}
}
strings.xml
<resources>
<string name="app_name">RadioButton</string>
<string
name="hello_world">Hello world!</string>
<string
name="action_settings">Settings</string>
</resources>
AndroidManifest.xml
<?xml version="1.0"
encoding="utf-8"?>
<manifest
xmlns:android="http://schemas.android.com/apk/res/android"
package="com.serkancay.radiobutton" >
<application
android:allowBackup="true"
android:icon="@mipmap/ic_launcher"
android:label="@string/app_name"
android:theme="@style/AppTheme" >
<activity
android:name=".MainActivity"
android:label="@string/app_name"
>
<intent-filter>
<action android:name="android.intent.action.MAIN"
/>
<category
android:name="android.intent.category.LAUNCHER" />
</intent-filter>
</activity>
</application>
</manifest>
4.2
Example 2
https://examples.javacodegeeks.com/android/core/ui/radiogroup/android-radiogroup-example/
|
The Android app is loaded initially.
|
The
basic attribute of
RadioGroup is android:checkedButton, that specifies which radio button
should be checked by default. The other components are inherited from the View class. As you can notice from the
code above, the set of the radio buttons are embodied by a RadioGroup, so every configuration of its
component affects the radio buttons too. (
RadioGroup element'in android:checkedButton attribute'üne hangi RadioButton
element'in id'sini assign edersek o radioButton default olarak seçili activity
ilk açıldığında. Bu örnekte kullandığımız RadioButton element'inin diğer
attribute'leri View class'ından miras olarak gelir. RadioButton element'ler
RadioGroup element içerisinde yazılır, RadioGroup element'ine yapılan
configuration'lar RadioButton element'lerini de etkiler.
Bu örnekte user
interface'i RelativeLayout element kullanarak tasarladık. )
3. Set the string values
At this step we just going to declare
the string references from the
activity_main.xml to the appropriate resource. ( activity_main.xml dosyasında, TextView, RadioButton ve Button
element'lerinin android:text attribute'lerini nasıl set ettiğimize dikkat et.
Örneğin;
- TextView element'de android:text =
"Merhaba" dersek textview element'in içerisine "Merhaba"
string'ini doğrudan set etmiş oluruz.
- TextView element'de android:text = "@+id/myText" dersek, burdan şu anlaşılır.
res/values/strings.xml dosyasında myText isimli bir variable tanımlanmıştır, bu variable'ın değeri
TextView element'in içerisinde gösterilir.
)
Here is the
res/values/strings.xmlRadioGroup.
( RadioGroup'daki
başka bir seçenek seçilirse bu değişimi nasıl ederiz görelim ) Now let’s have a look at the code above. When a checked radio button is changed in its group,
OnCheckedChangeListener is invoked in order to handle this situation. The onCheckedChanged() method of this interface, includes
the unique id of the radio button that was selected and caused the invoke of
the callback.In this example we will show you another way of selecting the choice information (for example when a button is pressed). This can be done through
getCheckedRadioButtonId(), which is a public function of RadioGroup class. This method returns the
unique id of the radio button that is chosen from the group. You can have a
look at the code to see how you can handle both situations.Of course Android system provides us a more dynamic way of changing and handling the attributes of the application views. As a prerequisite is to map every view with the unique id component of the XML. This can be done via
findViewById() method.( Yukarıdaki activity_main.xml dosyasını inceleyelim. Bir radio gruptaki seçili olan radioButton değişirse yani başka bir radioButton check edilirse, onCheckedChangeListener() class'ının onCheckedChanged() method'u invoke edilir otomatik olarak.
onCheckedChanged() method'unun aldığı 2.
parametre seçili olan RadioButton'un id'sidir; dolayısıyla bu parametreyi
RadioButton element'lerinin id'leriyle kıyaslayarak hangi RadioButton'ın
seçildiğini anlarız. checkedId == R.id.silent true return ederse silent id'li
RadioButton seçilmiştir. checkedId == R.id.sound true return ederse sound id'li
RadioButton seçilmiştir. Yani onCheckedChanged() method'unun aldığı
2.parametre'yi ve RadioButton element'lerinin id'lerini kıyaslıyoruz. Bu
radioButton element'lerden birisi seçilir seçilmez, ekranda bir toast mesajı
görünür. )
radioGroup.setOnCheckedChangeListener(new
OnCheckedChangeListener() {
@Override
public void
onCheckedChanged(RadioGroup group, int checkedId) {
// find which radio button is selected
if(checkedId
== R.id.silent) {
Toast.makeText(...).show();
} else
if(checkedId == R.id.sound) {
Toast.makeText(...).show();
} else {
Toast.makeText(...).show();
}
}
});
Ayrıca bu örnekte
butona tıklayarak da hangi radioElement'in seçildiğini öğrenebiliriz. Butona
tıklayınca RadioGroup element'inin
Ayrıca sound = (RadioButton) findViewById(R.id.sound); diyerek main_activity.xml
dosyasındaki sound id'li RadioButton'u elde etmiştik. Sonra sound.getId() demek ilgili
element'in yani RadioButton element'in id'sini yani sound'u return eder. selectedId == sound.getId() diyerek, recently
choose edilen RadioButton element'in id'si ile sound variable'ının refer ettiği
RadioButton element'in id'si aynı diye bakılır. Aynıysa textView set edilir.getCheckedRadioButtonId() method'u çağırılır.
Bu method, seçili RadioButton element'inin id'sini return eder. Örneğin,
radioGroup.getCheckedRadioButtonId(), seçili radioButton element'in id'sini
return eder.button.setOnClickListener(new OnClickListener() {
@Override
public void onClick(View v) {
int selectedId = radioGroup.getCheckedRadioButtonId();
// find which radioButton is checked by id
if(selectedId == sound.getId()) {
textView.setText("You chose 'Sound' option");
} else if(selectedId == vibration.getId()) {
textView.setText("You chose 'Vibration' option");
} else {
textView.setText("You chose 'Silent' option");
}
}
});
android.widget.RadioGroup.OnCheckedChangeListener interface'ini import ettiğimiz için OnCheckedChangeListener() interface'ini doğrudan kullanabildik.
radioGroup.setOnCheckedChangeListener(new OnCheckedChangeListener() {
@Override
public void onCheckedChanged(RadioGroup group, int checkedId) {
...
}
});
Eğer sadece android.widget.RadioGroup class'ını import etseydik şöyle demek zorunda kalacaktık.
radioGroup.setOnCheckedChangeListener(new RadioGroup.OnCheckedChangeListener() {
@Override
public void onCheckedChanged(RadioGroup group, int checkedId) {
...
}
});
OnCheckedChangeListener isimli interface RadioGroup class'ının sahip olduğu bir nested class'dır. Yani RadioGroup class'ının içerisinde, OnCheckedChangeListener isimli bir nested class tanımlanmıştır.
Run the
application
As you can see, the radio
button – “Sound” is selected as default because we declared it through its id
to the android:checkedButton attribute at the layout of the
activity.( Programı ilk açtığımızda Sound
radioButton seçilidir çünkü radioGroup element'in android:checkedButton
attribute'üne sound radioButton element'inin id'sini assign etmiştik. )
Now
let’s choose another radio button, for example “Vibration”. A
Toast is displayed on the screen because
the callback method of the OnCheckedChangeListener is initialized. ( Hadi Vibration radioButton'ı seçelim. Bu butonu seçince
ekranda aşağıdaki gibi bir toast mesajı gösterilir. Çünkü bu radioGroup
element'inin setOnCheckedChangeListener method'unu çağırarak radioGroup'u
dinlemeyi sağlamıştık. Bu radioButton
seçilince OnCheckedChangeListener class'ının onCheckedChanged() method'u
çağırılır. Seçilen RadioButton hangisi diye bakılır if statement'larla. Ve bir
toast mesajı ekranda gösterilir. )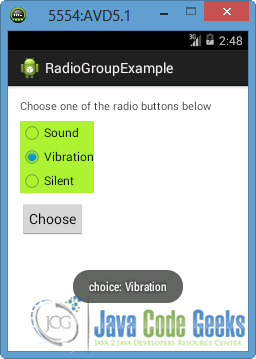
Selection of
another radio button
Now let’s select “Silent” radio button
and after the disappearance of the
Toast press “Choose” button. The TextView at the top of the screen changes to
indicate our choice, as you can see in the next image. This is happening
because getCheckedRadioButtonId() is called and a simple procedure is
done inside the onClick() operation of the OnClickListener interface, as you can see in the MainActivity.java.(Hadi
Silent RadioButton'ı seçelim. Bunu seçtiğimizde gene bir toast mesajı
gösterilir ekranda. Toast mesajı ekrandan kaybolduktan sonra Choose butonuna
basalım. Bu butona basınca yukarıdaki textview'deki yazı değişir, bu yazıda
Silent seçtiğimiz yazar. Hangi RadioButton'ın seçildiğini nasıl anlarız?
radioButton element'in getCheckedRadioButtonId() method'u çağırılır, bu method seçili
RadioButton element'in id'sini return eder. )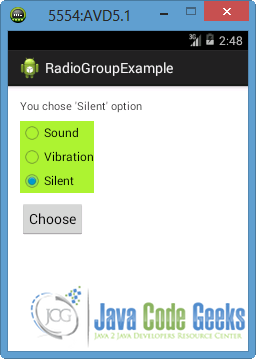
Press the “Choose” button after selecting another
radio button
http://www.journaldev.com/10251/android-radio-button-example-tutorial
https://www.tutorialspoint.com/android/android_radiogroup_control.htm
Hiç yorum yok:
Yorum Gönder