Önceki dersimize kaldığımızdan yerden devam edelim...
Before you put some actual functionality into this app, you need to clean up the storyboard a little. You will name the first tab “Players” and the second “Gestures”. You don’t change this on the Tab Bar Controller itself, but in the view controllers that are connected to these tabs. (Şimdi tab'lara isim verelim. 1.tab'ın ismi "Players" olsun, 2.tab'ın ismi "Gestures" olsun. İsmi değiştirmek için tab bar controller'ı değil, tab bar controller'a bağlı olan view controler'ları kullanırız, tab'a tıklayarak ismi set ederiz, veya document outline'da seçip sağdaki pencereden ismi set ederiz. )
As soon as you connect a view controller to a Tab Bar Controller, it is given a Tab Bar Item object which you can see in the Document Outline or the bottom of the scene. You use this Tab Bar Item to configure the tab’s title and image seen on the Tab Bar Controller.
Select the Tab Bar Item inside the Navigation Controller, and in the Attributes inspector set its Title to Players: (Tab bar controller'a bir view controller bağladığımızda, ekranda ve document outline'da otomatik olarak bir tab bar item yaratılır. navigation controller'ın içindeki bu tab bar item'ı seçeriz -> attributes inspector başlığı altından tab'ın title'ını players olarak set ederiz. )

Rename the Tab Bar Item for the view controller from the second tab to Gestures in the same manner. (Diğer tab'ı da benzer şekilde Gestures diye isimlendirelim. )
A well-designed app should also put some pictures on these tabs. The resources for this tutorial contains a subfolder named Images. Drag that folder into the Assets.xcassets subfolder in the project. (İyi dizayn edilmiş bir uygulamada tab'larda resim de olmalıdır. Biz de tab'larımıza resim koyacağız. Images isimli bir klasör oluşturup içine 2 tab için birer resim koyalım -> Sonra images klasörünü projedeki Assets.xcassets klasörüne taşıyalım. )
Back in Main.storyboard, in the Attributes inspector for the Players Tab Bar Item, choose the Players.png image. Give the Gestures item the image Gestures.png. (Main.storyboard'u açalım -> tab bar item'ları tek tek seçip Attributes inspector'da sırasıyla Players.png ve Gestures.png resimlerini seçelim. Tab'larda gösterilecek resimleri de set etmiş olduk böylece. )

A view controller that is embedded inside a Navigation Controller has a Navigation Item that is used to configure the navigation bar. Select the Navigation Item for the Table View Controller in the Document Outline and change its title in the Attributes inspector to Players. (Players tab'ındaki ekranın title'ını nasıl değiştiririz ?
Navigation Controller'ın içinde gömülü olan view controller bir navigation item'a sahiptir. Bu navigation item kullanılarak navigation bar configure edilir. Bizim uygulamamızda Navigation Controller'ın içinde table view controller gömülü olduğu için, table view controller bir navigation item'a sahiptir, document outline'da bu navigation item'ı seçelim -> Attributes inspector'da navigation item'ın title'ını "Players" olarak set edelim. Böylece Players tab'ındaki ekranın title'ını ayarlamış oluruz. )

Notice that the Scene title in the Document Outline now changes to Players. (1.tab'ın ekranının başlığı değişip Players oldu, aşağıda görebilirsin : )
Alternatively, you can double-click the navigation bar and change the title there. Note that you should double-click the simulated navigation bar in the Table View Controller, not the actual Navigation Bar object in the Navigation Controller. ( Tab'ın title'ını şöyle de değiştirebilirdik : navigation bar'a çift tıkla -> title'ı değiştir. Dikkat, Table View Controller'daki simulated navigation bar'a tıklamalısın, Navigation Controller'daki gerçek Navigation Bar object'e değil! )
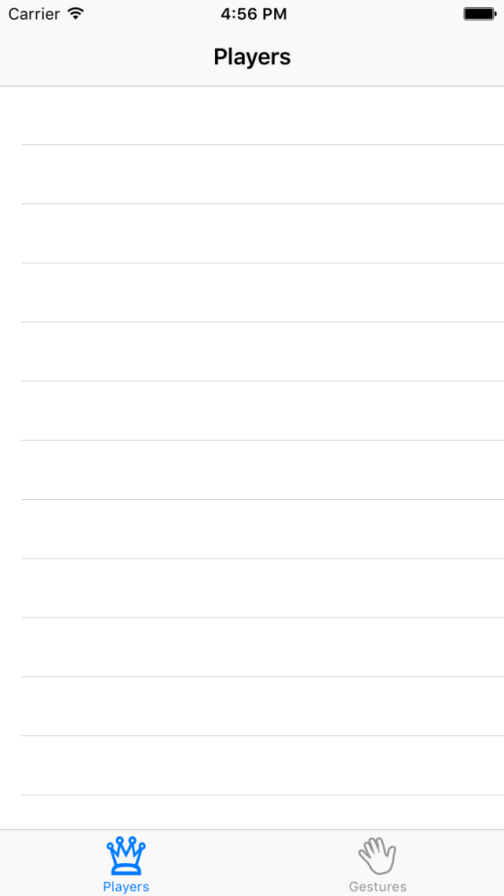
Run the app and marvel at your pretty tab bar, created without writing a single line of code! (Uygulamayı çalıştıralım ve tek satır kod yazmadan oluşturduğumuz güzelim tab bar'ı inceleyelim: )
Prototype Cells
Prototype cells allow you to easily design a custom layout for your table view cells directly from within the storyboard editor. ( Table view'in cell'leri(satırları) için custom layout dizayn etmek için storyboard editor'deki Prototype cells'i kullanabiliriz. )
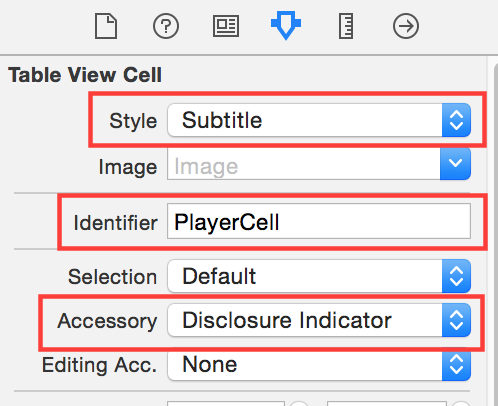
The Table View Controller comes with a blank prototype cell. Click on that cell to select it and in the Attributes inspector set the Style option to Subtitle. This immediately changes the appearance of the cell to include two labels. ( Table View Controller ile birlikte, boş bir prototype cell(boş satır layout) gelir. Bu prototype cell'i seçmek için bu prototype cell'e tıklayalım -> Attributes inspector'da style seçeneğini Subtitle seçelim. Bunu yapınca cell'de 2 tane label eklemiş oluruz, cell'in görünümü değişir, cell artık 2 tane label içermektedir. Yani prototype cell'in style'ını değiştirerek layout'unu değiştirmiş olduk aslında: )
With so much stackable content on a storyboard, it can sometimes be difficult to click on exactly what you want. If you have trouble, there are several options. One is that you can select the item in the Document Outline to the left of the canvas. The second is a handy hotkey: hold control + shift and click on the area you’re interested in. A popup will appear allowing you to select any element directly under your cursor. (storyboard'da çok fazla sayıda üst üste geçmiş content varsa, istediğimiz content'i seçmek zor olabilir. Bu konuda sorun yaşıyorsak şu 2 yolla bir çözüm bulabiliriz :
1 - Seçmek istediğimiz şeyi Document Outline'dan seçeriz.
2 - Ctrl ve shift tuşlarına basılı tutup seçmek istediğimiz şeye tıklarız. Tıkladığımız alanda bir popup menü çıkar, seçmek istediğimiz elemanı bu pop-up menüden seçeriz. )
If you’ve used table views before and created your own cells by hand, you may recognize this as the UITableViewCellStyle.Subtitle style. With prototype cells you can either pick one of the built-in cell styles as you just did, or create your own custom design (which you’ll do shortly). (Daha önce table view kullandıysak ve kendi cell'lerimizi elimizle yarattıysak bu style'ın UITableViewCellStyle.Subtitle olduğunu biliriz. Prototype cells için, istersek yukarıda olduğu gibi, built-in style'ları kullanabiliriz, ya da kendi custom design'ımızı oluşturabiliriz. Birazdan kendi custom design'ımızı oluşturmayı öğreneceğiz. )
Set the Accessory attribute to Disclosure Indicator and in the Identifier field type PlayerCell. All prototype cells should have a reuse identifier so that you can refer to them in code. ( Table View Controller'da prototype seçili iken, attribute'leri aşağıdaki gibi set etmeliyiz. Prototype cell'in id'sini(identifier'ını) PlayerCell olarak set ettik. Kodda bu id'yi kullanarak prototype cell'e refer edebiliriz tıpkı android'de view'lere id verip bu view'lerin id'sini kullanarak koddan bu view'lere erişmek gibi. Tüm prototype cells için mutlaka identifier set etmeliyiz ki bu prototype cell'e kod'dan bu id'yi kullanarak erişebilelim. )
Run the app, and… nothing has changed. That’s not so strange: you still have to make a data source for the table so it will know what rows to display. That’s exactly what you’re going to do next. (Uygulamayı çalıştırdığımızda table view controller'ın satırlarında hiçbir değişiklik olmadığını görürüz. Çünkü table'ın satırlarında gösterilecek bir data source tanımlamadık. Şimdi table için bir data source tanımlayacağız. )
Add a new file to the project. Choose the Cocoa Touch Class template under iOS/Source. Name the class PlayersViewController and make it a subclass of UITableViewController. Uncheck Also create XIB file. Choose the Swift language and hit Next followed by Create. (Projemize yeni bir dosya(class) ekleyelim. iOS/Source altındaki Cocoa Touch Class'ını seçelim -> Class ismimiz PlayersViewController olsun. Parent class'ımız UITableViewController olsun -> "Create XIB file"daki tick'i silelim -> Swift dilini seçelim -> Next . )

Go back to the storyboard and select the Table View Controller (make sure you select the actual view controller and not one of the views inside it). In the Identity inspector, set its Class to PlayersViewController. That is the essential step for hooking up a scene from the storyboard with your custom view controller subclass. Don’t forget this or your class won’t be used! ( Storyboard'a geri dönelim ve table view controller'ı seçelim. table view controller'ı seçtiğimizden emin olalım, yanlışlıkla table view controller'In içerdiği view controller'ları seçmiş olmayalım, dikkat.
Sonra sağ taraftaki identity inspector tab'da, Class'ı PlayersViewController olarak set edelim. Böylece storyboard'daki bir ekran ile custom view controller subclass'ımızı bağlamış oluruz. )

From now on when you run the app that table view controller from the storyboard is an instance of the PlayersViewController class. ( Bundan sonra uygulamayı çalıştırdığımızda, storyboard'daki table view controller artık custom view controller subclass'ımızın yani PlayersViewController class'ımızın instance'ı olacaktır. )
The table view should display a list of players, so now you will create the main data model for the app – an array that contains Player objects. Add a new file to the project using the Swift File template under iOS/Source. Name the file Player. ( Table view'de oyuncuların bir listesi gösterilecektir. Bir player'ı temsil eden bir class tanımlayacağız şimdi.
Projemize yeni bir file ekleyelim. Swift Template'ini kullanalım. Dosya ismi Player olsun. )
Replace the code in Player.swift with: ( Player.swift dosyasına aşağıdaki kodları yazalım: )
import UIKit
struct Player {
var name: String?
var game: String?
var rating: Int
init(name: String?, game: String?, rating: Int) {
self.name = name
self.game = game
self.rating = rating
}
}
There’s nothing special going on here. Player is simply a container object for these three properties: the name of the player, the game they’re playing, and a rating of 1 to 5 stars. ( Player class'ında bir oyuncunun şu 3 özelliği tutulur : oyuncu ismi, oyun ismi, puanlama. )
You’ll next make an array of Player objects and then assign it to an array in PlayersViewController. Start by creating a new file using the Swift File template named SampleData. Add this to the end of SampleData.swift: ( Swift file template'i kullanarak yeni bir dosya daha yaratalım. Dosya ismi SampleData olsun. SampleData.swift dosyasının sonuna aşağıdaki kodu yazalım: )
//Set up sample data
let playersData = [
Player(name:"Bill Evans", game:"Tic-Tac-Toe", rating: 4),
Player(name: "Oscar Peterson", game: "Spin the Bottle", rating: 5),
Player(name: "Dave Brubeck", game: "Texas Hold 'em Poker", rating: 2) ]
Here you’ve defined a constant called playersData and assigned an array of hard coded Player objects to it. ( Burada playersData isimli bir constant tanımladık. Bu constant'ın kendi tanımladığımız bir array'e refer etmesini sağladık. Oyuncu bilgilerini kendimiz elle girdik Player class'ından object yaratırken. )
Now add a Player array property just below class PlayersTableViewController: ( PlayersTableViewController class'ında Player object'leri tutan bir array'e refer eden bir variable tanımlayalım. ) UITableViewController in PlayersViewController.swift to hold the list of players: ( )
var players:[Player] = playersData
You could simply have set up the sample data in PlayersViewController when defining the players variable. But because this data might later be provided from a plist or an SQL file, it’s wise to handle loading the data outside of the view controller.
Now that you have an array full of Player objects, you can continue hooking up the data source in PlayersViewController. Still in PlayersViewController.swift, replace the table view data source methods with the following: (PlayersTableViewController class'ında players variable'ını tanımladıktan sonra player object'leri içeren array'i burada da tanımlayabilirdik. Ama oyuncu bilgilerinin daha bir plist'den veya SQL dosyasından sağlanabileceğini düşünüp daha modular bir code yazdık. Şimdi data source'u(players object'leri içeren array'i) view controller'da tanımlanan players variable'a bağlamalıyız.
PlayersViewController.swift dosyasında aşağıda gösterilen table view data source method'larını yazalım : )
override func numberOfSectionsInTableView(tableView: UITableView) -> Int {
return 1
}
override func tableView(tableView: UITableView, numberOfRowsInSection section: Int) -> Int {
return players.count
}
The real work happens in cellForRowAtIndexPath. Replace this method, which is currently commented out, with: (Şu an comment'li olan tableView method'unu değiştirip aşağıdaki gibi implement edelim: )
override func tableView(tableView: UITableView, cellForRowAtIndexPath indexPath: NSIndexPath)
-> UITableViewCell {
let cell = tableView.dequeueReusableCellWithIdentifier("PlayerCell", forIndexPath: indexPath)
let player = players[indexPath.row] as Player
cell.textLabel?.text = player.name
cell.detailTextLabel?.text = player.game
return cell
}
The method dequeueReusableCellWithIdentifier(_:forIndexPath:) will check to see if there is an existing cell that can be recycled. If not, it will automatically allocate a prototype cell and return it to you. All you need to do is supply the re-use identifier that you set on the prototype cell in the storyboard editor – in this case PlayerCell. Don’t forget to set that identifier, or this little scheme won’t work! (dequeueReusableCellWithIdentifier() method'u, adı üzerinde reusable cell var mı diye bakar, yani recycle edilebilecek cell var mı diye bakar. Recycle edilebilecek cell yoksa, otomatik olarak hafızadan bir prototype cell'lik yer alır ve bunu return eder. dequeueReusableCellWithIdentifier() method'una argument olarak prototype cell'in reusable identifier'ını yani "PlayerCell"i veririz. Prototype cell'in identifier'ını PlayerCell olarak set etmeyi unutmayın yoksa kodunuz çalışmaz. dequeueReusableCellWithIdentifier() method'u çağırılarak elde edilen cell(satır)daha sonra doldurulur. )
Run the app, and behold, the table view has players in it! ( Uygulamayı çalıştırdığmızda, table view'de oyuncular gösterilir aşağıdaki gibi: )
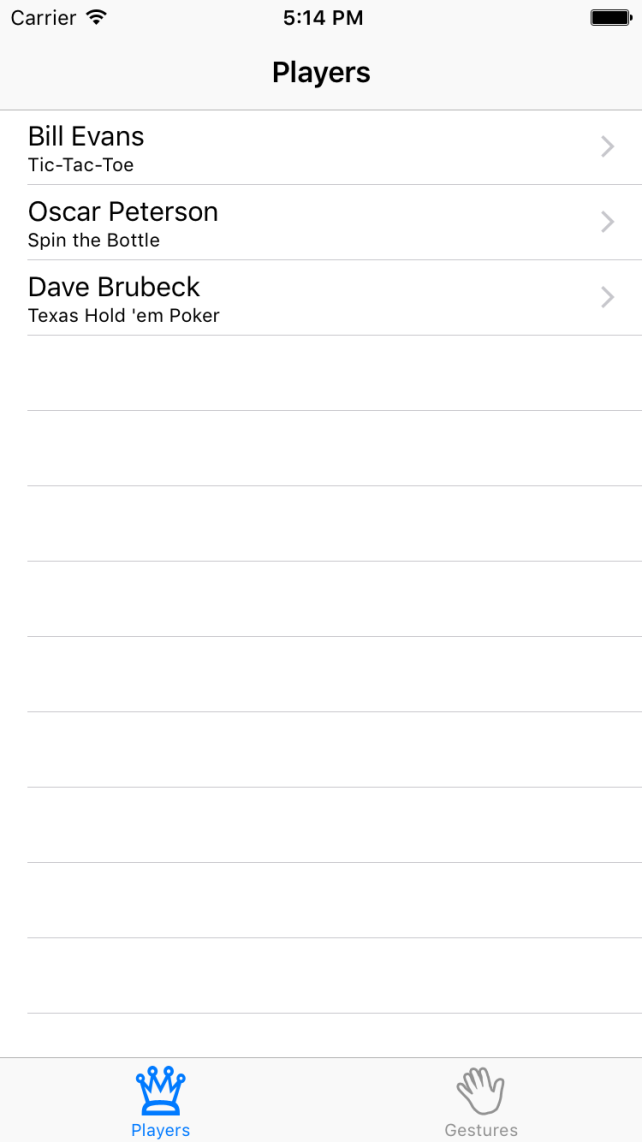
It takes just a few lines of code to use these prototype cells. I think that’s just great! ( Bu prototype cell'leri kullanabilmek için sadece bir kaç satır kod yazdık. Bu harikulade bir şeydir! )
Note: In this app you’re using only one prototype cell but if your table needs to display different kinds of cells then you can simply add additional prototype cells to the storyboard.
You can either duplicate the existing cell to make a new one, or increment the value of the Table View’s Prototype Cells attribute. Be sure to give each cell its own re-use identifier, though. ( Bu uygulamada, sadece bir tane prototype cell kullandık. Ama table'da farklı çeşitte cell'ler(satır layout'ları) gösterilecekse, her çeşit cell için storyboard'a bir prototype cell eklenmelidir.
Varolan cell'i kopyalayarak yeni bir cell oluşturabiliriz, veya table view'in Prototype Cells attribute'ünü bir arttırmalıyız. Herbir cell'e unique bir re-use identifier verdiğimizden emin olalım. )
Designing Your Own Prototype Cells
Using a standard cell style is OK for many apps, but for this app you want to add an image on the right-hand side of the cell that shows the player’s rating (one to five stars). Having an image view in that spot is not supported by the standard cell styles, so you’ll have to make a custom design. ( Built-in cell style(row layout) kullanmak çoğu uygulama için yeterli olabilir. Ancak kendi custom row layout'umuzu, yani kendi custom cell style'ımızı yaratmak mümkündür. Her satırda sağ tarafa bir inmage koymak ve bu image'da oyuncunun rating'ini(puanını) gösteren bir image göstermek istiyoruz. Böyle bir built-in cell style olmadığı için custom design yapacağız. )
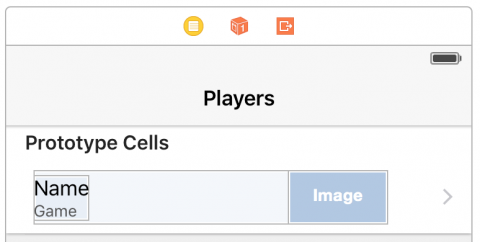
Switch back to Main.storyboard, select the prototype cell in the table view, and on the Attributes inspector, set its Style attribute to Custom. The default labels now disappear. ( Main.storyboard'a geri dönelim. Table view'de bir prototype cell seçelim -> Attributes inspector'da, Style'ı Custom seçelim. )
First make the cell a little taller. Either change the Row Height value in the Size inspector (after checking Custom) or drag the handle at the bottom of the cell. Make the cell 60 points high. ( Önce cell'in yüksekliğini biraz arttıralım. Bunu cell'i tabanındaki handle'dan sürükleyerek veya Size inspector başlığı altındaki Row Height değerini 60 point yapalım. )
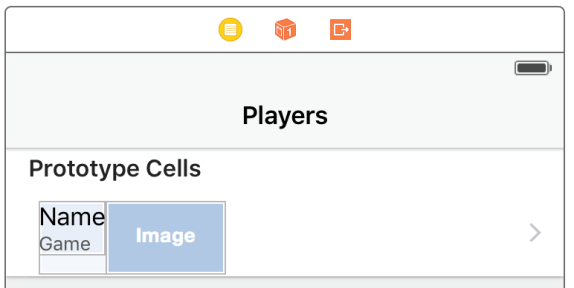
Drag two Label objects from the Objects Library into the cell and place them roughly where the standard labels were previously. Just play with the font and colors in the Attributes Inspector and pick something you like. Set the text of the top label to Name and the bottom label to Game. ( Cell'in(row'un) içine Object Library'den iki tane Label object taşıyalım. Attributes Inspector'dan istediğimiz font ve color'ı seçelim. Label'ların text'lerini sırayla "Name" ve "Game" olarak set edelim. )
Select both the Name and Game labels in the Document Outline using Command+click, and choose Editor -> Embed In -> Stack View. ( Document Outline'da, name ve game label'ını seçelim -> Üstteki menüden Editor -> Embed In -> Stack View 'e tıklayalım. Böylece bu iki label'ı bir stack view'in içine gömmüş oluruz. )
Note: Stack views are new in iOS 9 and are brilliant for easily laying out collections of views. ( Stack view'ler henüz yenidir, IOS 9 ile birlikte gelmiştir. Detay için google'layabilirsin. )
Drag an Image View into the cell and place it on the right, next to the disclosure indicator. In the Size Inspector, make it 81 points wide and 35 points high. Set its Mode to Center (under View in the Attributes inspector) so that whatever image you put into this view is not stretched.
Command + click the Stack View and Image View in the Document Outline to select both of them. Choose Editor\Embed in\Stack View. Xcode will create a new horizontal stack view containing these two controls. ( Cell'in içine bir Image View taşıyıp sağ tarafa disclosure indicator'ın yanına koyalım. Size inspector'dan, image view'in genişliğini 81 point, yüksekliğini 35 point yapalım. Attributes Inspector'dan, Image View'in Mode'unu Center olarak set edelim, bu bize şunu sağlar, image view'in içerisinde koyduğumuz image'ın imageview'de ortalanmasını sağlar, imageView'e sığsın diye image stretch edilmez(uzatılmaz). Command tuşuna basılı tutup Document Outline'da Stack View'e ve Image View'e tıklarız, böylece bu 2 view'i seçmiş oluruz. Sonra üst menüden sırayla şunlara tıklayarak bu 2 view'i Stack View içerisine gömeriz : Editor -> Embed in -> Stack View )
Select this new horizontal stack view, and in the Attributes Inspector, change the Alignment to Centre and the Distribution to Equal Spacing. ( Yeni yatay stack view'imizi seçelim -> Attributes Inspector'da, Alignment : Centre ve Distribution : Equal Spacing yapın. )
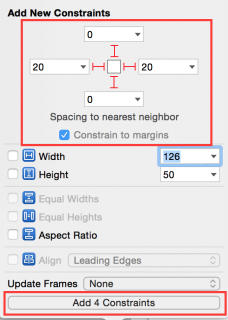
Now for some simple auto layout for this control. At the bottom right of the storyboard, click the Pin icon: ( Auto layout için, storyboard'un sağ altındaki pin icon'una tıklayalım, bu buton aşağıda gösterilmiştir. )

Change the top constraints to Top: 0, Right: 20, Bottom: 0 and Left: 20. Make sure that the four red pointers to the values are highlighted as in the picture. Click Add 4 Constraints at the bottom of the popover window. ( Aşağıdaki screeshot'daki gibi ayarlayalım constraint'leri -> 4 red pointer'ın screenshot'daki gibi parlak kırmızı vurgulu olduğundan emin olalım -> Add 4 Constraints butonuna tıklayalım. Bu konudan app resmi sitesindeki 1. tutorial'da bahsetmişti bu dökümana da ekledim, oraya bakabilirsin. )
If your stack view has orange constraints, it is misplaced. To fix this, select the horizontal stack view and choose Editor\Resolve Auto Layout Issues\Update Frames (in the Selected Views section of the menu). The stack view should position itself correctly and the orange constraint errors go away.
To position the image view within the stack view, select the image view in the Document Outline and choose Editor -> Resolve Auto Layout Issues -> Add Missing Constraints (in the Selected Views section of the menu). ( Stack view'deki image view'i pozisyonlandırmak için, Document Outline'da image view'i seçelim. -> Editor -> Resolve Auto Layout Issues -> Add Missing Constraints. Bunu neden yaptık anlamadım.)
The final design for the prototype cell looks something like this: (Prototype cell'in görünümü aşağıdaki gibidir artık : )
Because this is a custom designed cell, you can no longer use UITableViewCell’s textLabel and detailTextLabel properties to put text into the labels. These properties refer to labels that aren’t on this cell anymore; they are only valid for the standard cell types. Instead, you will use tags to find the labels. ( Bu bir custom designed cell olduğu için, ekranda 2 tane label göstermek için UITableViewCell'in textLabel ve detailTextLabel property'lerini kullanamayız, çünkü bunlar built-in style kullandığımızda gelir sadece. Custom cell kullandığmız için, label'ları(view'leri) bulmak için tag'ları kullanmalıyız.
ironman is here )
Tags are used here for simplicity. Later in this tutorial you’ll create a custom class that inherits from UITableViewCell and contains properties corresponding to the labels on your cell view. ( Tag'lar kolaylık olması için kullanılır. Birazdan UITableViewCell class'ını extend eden bir custom class yaratacağız. )
In the Attributes inspector, set the tag value for the Name label to 100, Game label to 101, and the Image View label 102.
Then open PlayersViewController.swift and add a new method called imageForRating at the end of the class as follows: ( Attributes inspector'da, Name label'ının tag değerini 100 yapalım, Game label'ının tag değerini 101 yapalım, Image View label'ının tag değerini 102 yapalım. Android'deki view kelimesinin ios'daki karşılığı olarak label kelimesi kullanılmış burda.
Sonra PlayersViewController.swift dosyasını açalım ve class'da şu method'u tanımlayalım: )
func imageForRating(rating:Int) -> UIImage? {
let imageName = "\(rating)Stars"
return UIImage(named: imageName)
}
Pretty simple – this returns a different star image depending on the rating. ( imageForRating() method'u, argument olarak aldığı rating'e göre farklı yıldız resmi return eder. )
Then, in PlayersViewController, change tableView(_:cellForRowAtIndexPath:) to the following:
override func tableView(tableView: UITableView, cellForRowAtIndexPath indexPath: NSIndexPath) -> UITableViewCell {
let cell = tableView.dequeueReusableCellWithIdentifier("PlayerCell", forIndexPath: indexPath) //1
let player = players[indexPath.row] as Player //2
if let nameLabel = cell.viewWithTag(100) as? UILabel { //3
nameLabel.text = player.name
}
if let gameLabel = cell.viewWithTag(101) as? UILabel {
gameLabel.text = player.game
}
if let ratingImageView = cell.viewWithTag(102) as? UIImageView {
ratingImageView.image = self.imageForRating(player.rating)
}
return cell
}
Here’s the breakdown of what you’ve done: ( tableView method'unu açıklayalım : )
- dequeueReusableCellWithIdentifier will dequeue an existing cell with the reuse identifier PlayerCell if available or create a new one if not. ( )
- You look up the Player object corresponding to the row being populated and assign it to player. ( )
- The labels and images are looked up by their tag on the cell and populated with data from the player object.
That should do it. Now run the app again, and it may look something like this: ( )

Hmm, that doesn’t look quite right – the cells appear to be squished. You did change the height of the prototype cell, but the table view doesn’t take that into consideration. There are two ways to fix it: you can change the table view’s Row Height attribute, or implement the tableView(tableView:heightForRowAtIndexPath:) method. The former is fine in this case because we only have one type of cell and we know the height in advance. ( )
Note: You would use tableView(tableView:heightForRowAtIndexPath:) if you did not know the height of your cells in advance, or if different rows can have different heights. ( )
Back in Main.storyboard, in the Size inspector of the Table View, set Row Height to 60: ( )
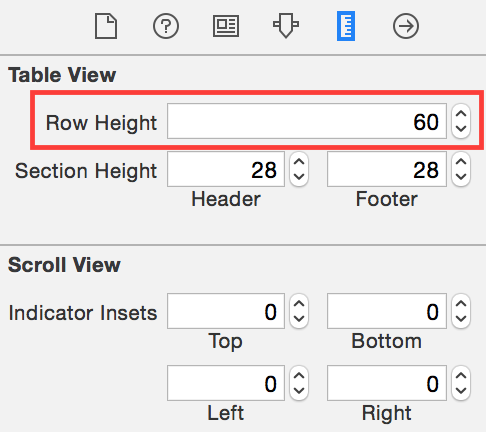
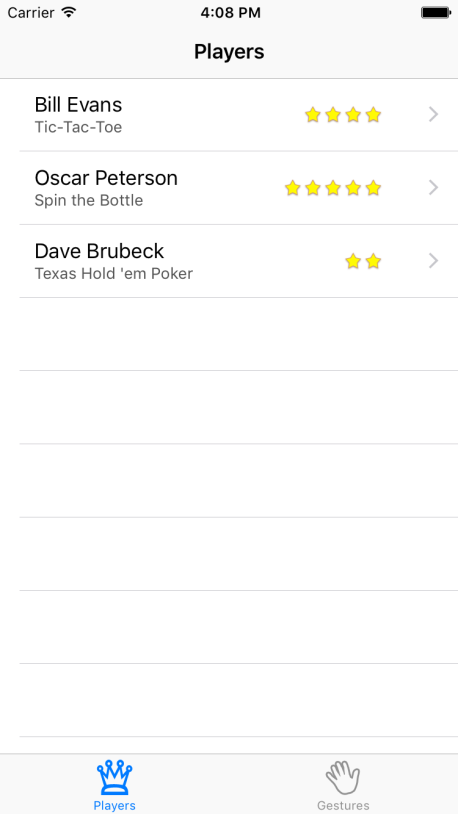
If you run the app now, it looks a lot better!
By the way, if you changed the height of the cell by dragging its handle rather than typing in the value, then the table view’s Row Height property was automatically changed too. So it may have worked correctly for you the first time around. ( )
Using a Subclass for the Cell
The table view already works pretty well but I’m not a big fan of using tags to access the labels and other subviews of the prototype cell. It would be much more clean if you could connect these labels to outlets and then use the corresponding properties. As it turns out, you can.
Add a new file to the project, with the Cocoa Touch Class template. Name it PlayerCell and make it a subclass of UITableViewCell. Don’t check the option to create a XIB, as you already have the cell in your storyboard. ( )
Add these properties in the PlayerCell class, just below the class definition: ( )
@IBOutlet weak var gameLabel: UILabel!
@IBOutlet weak var nameLabel: UILabel!
@IBOutlet weak var ratingImageView: UIImageView!
All these variables are IBOutlets, which can be connected up to your scene in the storyboard. ( )
Add this property just below the IBOutlets:
var player: Player! {
didSet {
gameLabel.text = player.game
nameLabel.text = player.name
ratingImageView.image = imageForRating(player.rating)
}
}
Whenever the player property is set, it will update the IBOutlets with the correct information.
Move the method imageForRating(_:) from PlayersViewController to the PlayerCell class to keep the cell details all in the same class.
Back in Main.storyboard, select the prototype cell PlayerCell and change its class to PlayerCell on the Identity inspector. Now whenever you ask the table view data source for a new cell with dequeueReusableCellWithIdentifier(_:forIndexPath:), it will return a PlayerCell instance instead of a regular UITableViewCell.
Note that you gave this class the same name as the reuse identifier – they’re both called PlayerCell – but that’s only because I like to keep things consistent. The class name and reuse identifier have nothing to do with each other, so you could name them differently if you wanted to.
Now connect the labels and the image view to these outlets. Navigate to the Connections Inspector in the storyboard and then select the Player Cell from either the canvas or Document Outline. Drag from the nameLabel Outlet in the Connections inspector to the Name label object in either the Document Outline, or the canvas. Repeat for gameLabel and ratingImageView.

Important: You should hook up the controls to the table view cell, not to the view controller! You see, whenever your data source asks the table view for a new cell with dequeueReusableCellWithIdentifier, the table view doesn’t give you the actual prototype cell but a copy (or one of the previous cells is recycled if possible).
This means there will be more than one instance of PlayerCell at any given time. If you were to connect a label from the cell to an outlet on the view controller, then several copies of the label will try to use the same outlet. That’s just asking for trouble. (On the other hand, connecting the prototype cell to actions on the view controller is perfectly fine. You would do that if you had custom buttons or other UIControls on your cell.)
Now that you’ve hooked up the properties, you can simplify the data source code a bit. In PlayersViewController, change tableView(_:cellForRowAtIndexPath:) to:
override func tableView(tableView: UITableView, cellForRowAtIndexPath indexPath: NSIndexPath)
-> UITableViewCell {
let cell = tableView.dequeueReusableCellWithIdentifier("PlayerCell", forIndexPath: indexPath)
as! PlayerCell
let player = players[indexPath.row] as Player
cell.player = player
return cell
}
That’s more like it. You now cast the object that you receive from dequeueReusableCellWithIdentifier to a PlayerCell, and then you can simply pass the correct player to the cell. Setting the player variable in PlayerCell will automatically propagate the values into the labels and image view, and the cell will use the IBOutlets that you wired up in the storyboard. Isn’t it great how using prototype cells makes table views a whole lot less messy?
Run the app and try it out. It should still look the same as before, but behind the scenes it’s now using your own table view cell subclass!
Hiç yorum yok:
Yorum Gönder