Önceki dersimize kaldığımızdan yerden devam edelim...
To get a feel for how the storyboard editor works, drag some controls from the Object Library in the lower right into the blank view controller: ( Storyboard editor'ün nasıl çalıştığını görmek için, sağ altta görülen Object Library'den bazı control'ler(view element'ler) taşıyalım : )
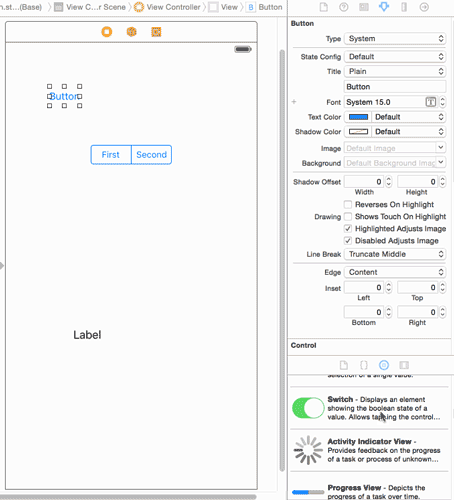
As you drag the controls in, they should show up on the Document Outline on the left: ( Control'leri scene'e taşıyalım. Aşağıdaki örnekte 1buton, 1 switch ve 1 label'ı scene'e taşıdık. Scene'e eklediğimiz controller'i soldaki document outline'da görebilirsin. )
The storyboard shows the contents of all your view controllers. Currently there is only one view controller (or scene) in your storyboard, but over the course of this tutorial you’ll be adding several others. (Storyboard, view controller'larımızın içeriklerini(UI) de gösterir. Şu anda storyboard'umuzda, sadece 1 tane view controller(scene, ekran)'ımız var. İlerleyen bölümlerde Storyboard'umuza başka view controller ekleyeceğiz.)
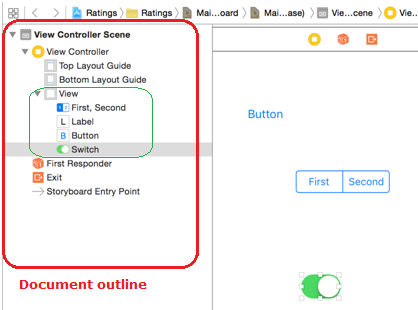
There is a miniature version of this Document Outline above the scene called the Dock: ( Scene(view controller)'in üzerinde dock diye de bilinen Document Outline'ın minyatür versiyonu gözükmektedir :)

The Dock shows the top-level objects in the scene. Each scene has at least a View Controller object, a First Responder object, and an Exit item, but it can potentially have other top-level objects as well. (Dock'da 3 tane buton görülmektedir. Doc, scene'deki top-level object'leri gösterir. Herbir scene en az şu 3 object'e sahiptir, bunlardan başka top-level object'lere de sahip olabilir:
- View Controller
- First Responder
- Exit item )
The Dock is convenient for making connections to outlets and actions. If you need to connect something to the view controller, you can simply drag to its icon in the Dock. ( Dock, outlet'lere ve action'lara bağlantı kurmak için uygundur. View controller'a bir şey bağlamak için, taşıdığımız şeyi Dock'daki View controller icon'una bırakırız. )
Note: You probably won’t be using the First Responder very much. This is a proxy object that refers to whatever object has first responder status at any given time. As an example, you can hook up the Touch Up Inside event from a button to First Responder’s cut: selector. If at some point a text field has input focus then you can press that button to make the text field, which is now the first responder, cut its text to the pasteboard. ( Muhtemelen, First Responder object'i kullanmaya hiç ihtiyacımız olmayacak. First Responder, bir proxy object'dir, ilk tepki verecek object'e refer eder. Örneğin bir text field aktifken bir butona tıklayınca text field'daki text kopyalanır diye anladım. )
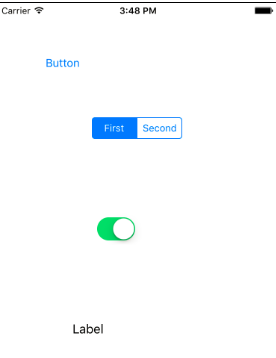
Run the app and it should look exactly like what you designed in the editor (yours may look different than the screenshot below – this is just for demonstration and will not be used later in the tutorial): ( Uygulamayı çalıştırdığımızda telefonumuzun ekranı aşağıdaki gibi görünür : )
The single View Controller you defined was set as the Initial View Controller – but how did the app load it? Take a peek at the application delegate to find the answer. Open up AppDelegate.swift and you’ll see the source starts with this: ( Uygulamada şu anda sadece bir tane view controller vardır ve bu view controller initial view controller'dır. Yani uygulama başlatıldığında gösterilen ilk view controller'dır. Peki uygulama bu view controller'ı nasıl yükler. )
import UIKit
@UIApplicationMain
class AppDelegate: UIResponder, UIApplicationDelegate {
var window: UIWindow?
func application(application: UIApplication, didFinishLaunchingWithOptions launchOptions: [NSObject: AnyObject]?) -> Bool {
// Override point for customization after application launch.
return true
}
The @UIApplicationMain attribute at the top of the file designates the AppDelegate class as the entry point for the module. It is a requirement for using storyboards that your application delegate inherits from UIResponder and that it has a UIWindow property. All the methods are practically empty. ( Yukarıda AppDelegate isimli bir class tanımladık. Bu class'ın üzerindeki @UIApplicationMain attribute, bu class'ı module'ün başlangıç noktası yapar. Yani module'de başlatılacak ilk class AppDelegate class'ıdır, bunu da @UIApplicationMain attribute sağlar. Storyboard kullanabilmek için şöyle bir requirement(gereklilik, zorunluluk) vardır:
- AppDelegate class'ınız, UIResponder class'ından miras almalıdır
- AppDelegate class'ınız, UIWindows type'ında bir property'ye sahip olmalıdır. )
Even application(_:didFinishLaunchingWithOptions:) simply returns true. (AppDelegate class'ında tanımladığımız application() fonksiyonu true return etsin dedik, başka bir şey implement etmedik bu fonksiyonda henüz. )
The secret is in the Info.plist file. Click on Info.plist in the Project Navigator and you’ll see this: ( Project Navigator'da görülen Info.plist dosyasına tıklayalım : )


Storyboard apps use the key UIMainStoryboardFile, also known as “Main storyboard file base name”, to specify the name of the storyboard that must be loaded when the app starts. When this setting is present, UIApplication will load the named storyboard file, automatically instantiate the “Initial View Controller” from that storyboard, and then put that controller’s view into a new UIWindow object.
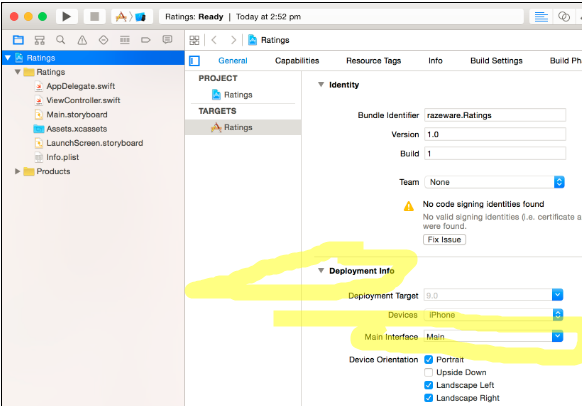
You can also see this in the Project Settings under the General tab and Deployment Info section: ( Yukarıdaki screenshot'da kırmızı ile çevirdiğimiz yere dikkat. Burada, uygulama başlatıldığında hangi storyboard'un load edileceğini belirleriz. Bu örnekte, uygulama başlatıldığında Main isimli storyboard'un load edilmesini söyledik. Bu ayar bu şekildeyse, UIApplication info.plist dosyasında belirlediğimiz main storyboard file base name'i, yani Main.storyboard'u otomatik olarak load eder, sonra bu storyboard'daki initial view controller'dan bir object yaratır ve bu object'i UIWindow object'e koyar.
Uygulama başlatıldığında hangi storyboard'un load edileceğini info.plist'den görebiliriz dedik, bunu başka bir yerden daha görebiliriz. Project Navigator'da uygulamaya tıklarız -> General tab'a tıklarız -> Deployment Info section'ı altına bakalım -> Main Interface başlığı altında, uygulama başladığında load edilecek stroyboard'un ismi yazmaktadır. Eğer farklı bir storyboard kullanacak olursak, buradaki ayarı değiştirmeliyiz. )

Just Add It To My Tab
The Ratings app you’re about to build has a tabbed interface with two screens. With a storyboard it is really easy to create tabs. ( Geliştirmek istediğimiz Ratings uygulamasında bir tabbed interface göstermek istiyoruz, tabbed interface'in 2 tane tab'ı olsun yani 2 tane ekranı olsun istiyoruz. Storyboard'lar sayesinde tab yaratmak çok kolaydır.)
You’ll want to start with a clean storyboard, so switch back to Main.storyboard and delete the view controller you worked with earlier. This can be done by clicking on View Controller in the Document Outline and pressing the Delete key. ( Temiz bir storyboard ile başlamak istiyoruz. Dolayısıyla Main.storyboard'a tıklayalım -> Document Outline'dan biraz önce üzerinde çalıştığımız view controller'ı bulup silelim.)
Drag a Tab Bar Controller from the Object Library into the canvas. You may want to maximize your Xcode window first, because the Tab Bar Controller comes with two view controllers attached and you’ll need some room to maneuver. You can zoom in and out by double-clicking the canvas, or you can set the zoom scale by ctrl-clicking the canvas and selecting the zoom level. ( Object Library'den Tab Bar Controller'ı bulup canvas'a taşıyalım. Tab bar Controller ile birlikte 2 tane view controller gelir. Bu 2 view controller, Tab bar controller'a bağlıdır.
Xcode penceresini maximize etmeye ihtiyacınız olabilir. İsterseniz canvas'a çift tıklayarak veya ctrl'ye basıp canvas'a tıklayarak zoom in veya zoom out yapabilirsiniz. )
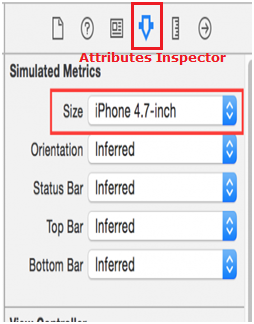
For convenience, again change the Simulated Metrics to show the scene as an iPhone. As you did before, select Tab Bar Controller in the Document Outline, and on the Attributes Inspector, change Size to iPhone 4.7 inch. This will also change the two embedded view controllers to simulate the iPhone 6 or 6s in the storyboard. ( Ekranı(scene'i) iPhone 6/6s ekranı gibi simulate etmek, göstermek için Simulated Metrics'i değiştirelim. Bunun için önce Document Outline'dan -> Tab Bar Controller'ı seçelim. -> Attributes Inspector tab'a tıklayalım -> Simulated Metrics section'ı altından size'ı iPhone 4.7 inch olarak set edelim. Tab bar controller'da yaptığımız bu ayar, tab bar controller'a gömülü olan 2 view controller'a etki eder. Gömülü olan bu view controller'lar yani tab 2 tab ekranı iPhone 6/6s ekranı gibi görünür. )
The new Tab Bar Controller comes pre-configured with two additional view controllers – one for each tab. UITabBarController is a so-called container view controller because it contains one or more other view controllers. Two other common containers are the Navigation Controller and the Split View Controller (you’ll use the Navigation Controller later). (Tab bar Controller ile birlikte 2 tane view controller gelir demiştik, herbir view controller bir tab'a karşılık gelir. Bu 2 view controller, Tab bar controller'a bağlıdır.
UITabBarController bir container view'dir çünkü 1 veya daha fazla view controller içerir. Diğer sık kullanılan container'lar ise Navigation Controller ve Split View Controller'dır.
İlerleyen bölümlerde Navigation Controller'ı da kullanacağız. )
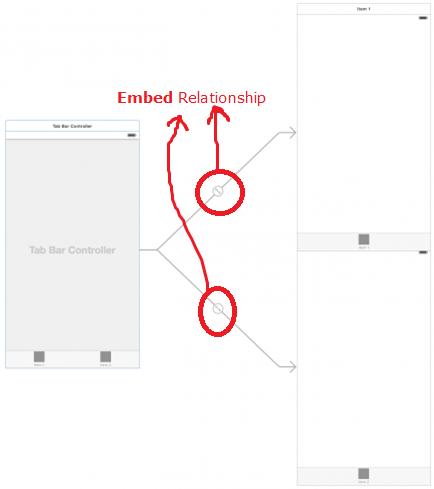
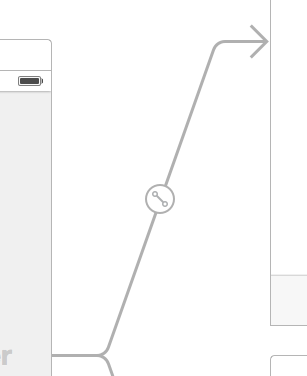
The container Relationship is represented by the arrows between the Tab Bar Controller and the view controllers that it contains. An embed Relationship in particular is signified by the icon seen below in the middle of the arrow body. ( Tab bar controller ve onun içerdiği view controller'lar arasındaki ok'lar Relationship container'ını temsil eder. Embed relationship'i yukarıda nasıl gösterilmiş inceleyelim. )
Note: If you want to move the Tab Bar Controller and its attached view controllers as a group, zoom out, and then you can ⌘-click or click and drag to select multiple scenes. This makes it possible to move them around together. (Selected scenes have a thin blue outline). ( Tab Bar controller ve view controller'ları seçip her birlikte hareket ettirmek istiyorsak, önce zoom out yaparız sonra ⌘ tuşuna basarız ve mouse tıklarız. Seçili view controller'ların kenarında kalın bir çizgi gözükür. )
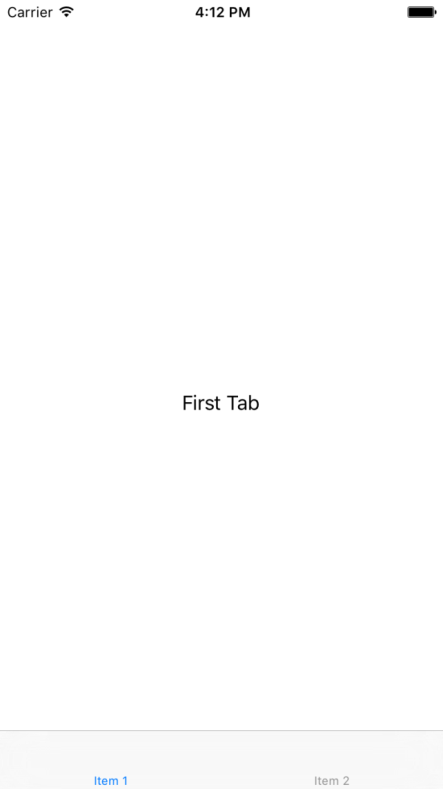
Drag a label into the first view controller (currently titled “Item 1”), double click it, and give it the text “First Tab”. Also drag a label into the second view controller (“Item 2”) and give it the text “Second Tab”. This allows you to actually see something happen when you switch between the tabs. ( 1. tab'a yani 1. view controller'a label view taşıyalım -> Label'a çift tıklayalım -> Label'daki text'i First Tab olarak set edelim.
2. tab'a yani 2. view controller'a label view taşıyalım -> Label'a çift tıklayalım -> Label'daki text'i Second Tab olarak set edelim.
Artık tab'lar arasında gidip geldikçe hangi tab'da olduğumuzu tab'lardaki bu text'lerden anlayabileceğiz. )
Note: You can’t drag stuff into the scenes when the editor is zoomed out. You’ll need to return to the normal zoom level first by double-clicking in the canvas. ( Editor zoom out iken yani uzaklaştırılmışken view controller'lara object taşıyamayız. View controller'lara object taşıyabilmek için normal zoom level'da olmalıyız. Canvas'a çift tıklayarak normal zoom level'a gelebiliriz. )
Build & Run, and you’ll see something similar to this in the console: ( Build & Run 'a tıklayınca console'da aşağıdaki gibi bir hata alırız : )
Ratings[18955:1293100] Failed to instantiate the default view controller for UIMainStoryboardFile 'Main' - perhaps the designated entry point is not set?
Ratings[18955:1293100] Failed to instantiate the default view controller for UIMainStoryboardFile 'Main' - perhaps the designated entry point is not set?
Fortunately, the error is pretty clear here – you never set an entry point, meaning you didn’t set the Initial View Controller after you deleted the scene used earlier. To fix this, select the Tab Bar Controller and go to the Attributes Inspector. Check the box that says Is Initial View Controller. ( Hata mesajı çok açıklayıcıdır, bize storyboard'umuzun default bir view controller'ı olmadığını söyler. Bir entry point(başlangıç noktası) kurmadığımız için böyle bir hata aldık. Proje yaratıldığında default olarak gelen view controller'ı silmiştik hatırla, daha sonra tab view controller eklemiştik storyboard'a. Ancak default view controller'ı sildikten sonra hiçbir view controller'ı default yapmamıştık. Tab bar controller'ı default view controller yaplaım bu sorunu çözmek için Tab bar controller'ı seçelim -> Attributes Inspector tab'ında "Is Initial View Controller" checkbox'a tick koyalım. )

In the canvas, the arrow that used to point to the deleted view controller now points at the Tab Bar Controller: ( Bu tick'i koyduk -> Önceden sildiğimiz view controller'a doğru olan ok işareti artık tab bar controller'a doğru olacaktır. )

This means that when you run the app, UIApplication will make the Tab Bar Controller the main screen. Run the app and try it out. The app now has a tab bar and you can switch between the two view controllers with the tabs: (Uygulamayı çalıştırdığımızda, UIApplication Tab Bar Controller'I ana ekran(açılış ekranı) yapacaktır. Uygulamayı çalıştırıp deneyebiliriz bunu. Uygulamamız artık bir tab bar'a sahiptir. Tab bar controller'da gömülü olan 2 view controller(2 tab) arasında geçiş yapabiliriz: )
Tip: To change the initial view controller, you can also drag the arrow between view controllers. ( Initial view controller'ı set etmeyi yukarıda öğrendik, alternatif olarak view controller'a gdoğru olan ok'u taşıyarak da initial view controller'ı set edebiliriz. )
Xcode actually comes with a template for building a tabbed app (unsurprisingly called the Tabbed Application template) that you could have used, but it’s good to know how this works so you can also create a Tab Bar Controller by hand if you have to. (XCode'da tab uygulaması yapmak için hazır template(Tabbed Application template) zaten vardır. Ancak bunu yukarıda olduğu gibi kendimiz manuel olarak da yapabiliriz. Manuel olarak nasıl yapılabildiğini bilmek bir avantajdır biz bunu öğrendik ihtiyacımız olursa kullanırız. )
Note: If you connect more than five scenes to the Tab Bar Controller, it automatically gets a More… tab when you run the app. Pretty neat! (tab bar controller'a 5'den fazla view controller gömersek, uygulamayı çalıştırdığımızda tab'ların olduğu yerde More... tab gösterilecektir. )
Adding a Table View Controller
The two scenes that are currently attached to the Tab Bar Controller are both regular UIViewController instances. You are going to replace the scene from the first tab with a UITableViewController instead. (Tab Bar Controller'a gömülü-bağlı olan 2 ekran UIViewControll object'lerdir. Şimdi 1. gömülü ekranı silip yerine bir UITableViewController object koyacağız. )
Click on that first view controller in the Document Outline to select it, and then delete it. From the Object Library drag a new Table View Controller into the canvas in the place where that previous scene used to be: (Document Outline'da, Tab Bar Controller'a gömülü olan 1.view controller'a tıklayarak bu view controller'ı seçelim. -> Seçili olan bu view controller'ı silelim. Object Library'den bir Table View Controller'ı alıp, Canvas'daki 1.view controller'dan boşalan yere taşıyalım: )
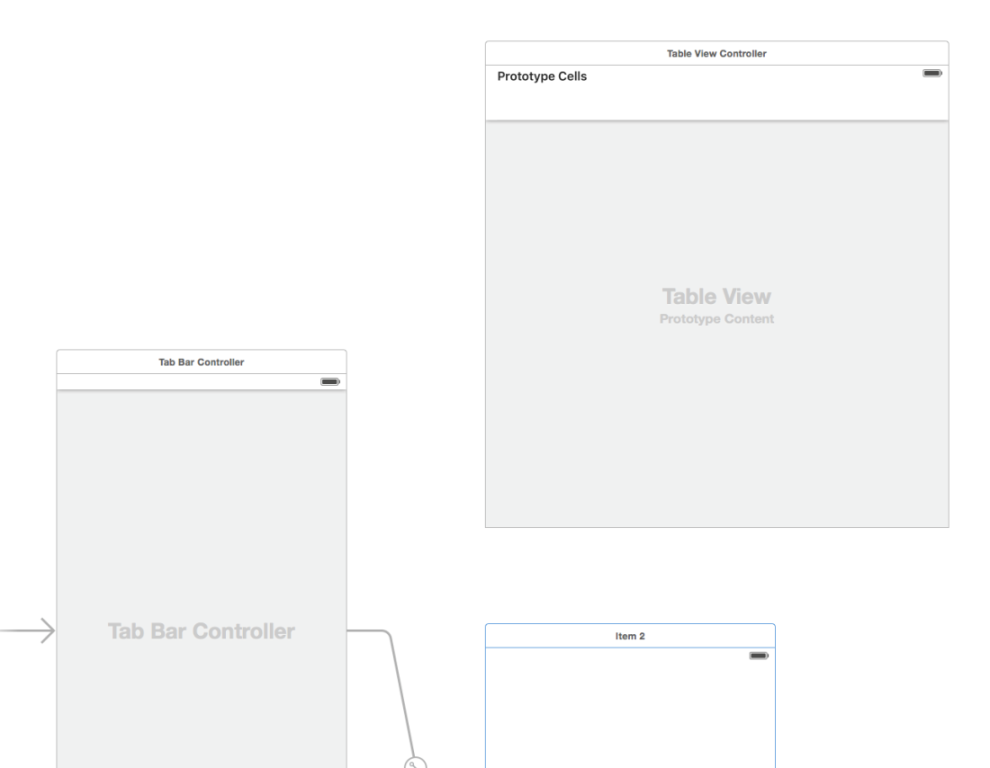
Now you want to place the Table View Controller inside a navigation controller. With the Table View Controller selected, choose Editor\Embed In\Navigation Controller from Xcode’s menubar. This adds yet another controller to the canvas: (Şimdi ise Table View Controller'ımızı, bir navigation controller'ın içerisine koymak, gömmek istiyoruz. Document Outline'da Table View Controller'ı seçelim -> Xcode'un menübar'ında sırasıyla şunlara tıklayalım : Editor -> Embed In -> Navigation Controller. -> Böylece canvas'a navigation controller eklemiş oluruz. Bu işlemi table view controller seçili iken yaptığımız için, eklediğimiz navigation controller'a table view controller'ı gömeriz. )

Navigation controller ve tab bar controller arasında embed ilişkisi vardır :
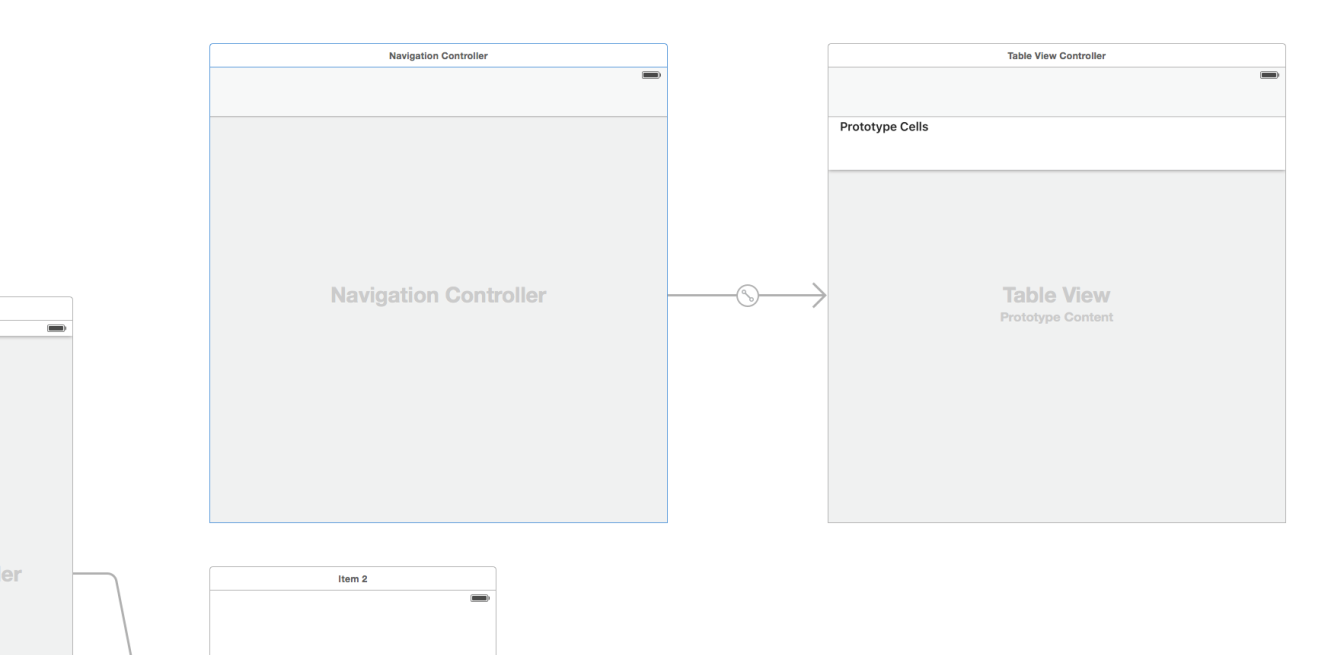
You could also have dragged in a Navigation Controller from the Object Library and embedded the tableview, but this Embed In command is a nice time saver for a common action. ( Navigation controller'ı canvas'a menu bar'dan değil de object library'den de ekleyebiliriz, sonra ise table view'i bu navigation controller'a gömebiliriz. Ancak bu işlemi menü bar'ı kullanarak yapmak bize zaman kazandırır, daha kolaydır. )
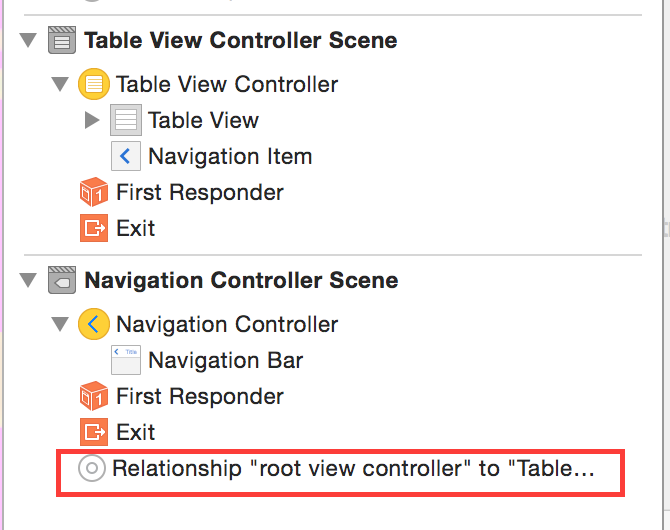
Because the Navigation Controller is also a container view controller (just like the Tab Bar Controller), it has a relationship arrow pointing at the Table View Controller. You can also see these relationships in the Document Outline: (Navigation Controller da tıpkı Tab Bar Controller gibi bir container'dır, bir veya daha fazla view controller içerir. Dolayısıyla Navigation Controller ve table view controller arasında bir gömme ilişkisi vardır, bunu table view controller'a doğru olan oktan anlayabilirsin. Bu ilişkiyi Document Outline'da da görebiliriz, navigation controller'daki aşağıda görünen text, ilişkinin hangi view controller'a doğru olduğunu söyler : )
Notice that embedding the Table View Controller gave it a navigation bar. Interface Builder automatically put it there because this scene will now be displayed inside the Navigation Controller’s frame. It’s not a real UINavigationBar object, but a simulated one. Simulated Metrics will infer the context around the scene and show a navigation bar when it’s inside a Navigation Controller, a tab bar when it’s inside a Tab Bar Controller, and so on. (Table View Controller'ı, Navigation Controller'ın içine gömerek şunu sağladık : table view controller'da bir navigation bar gözükmesini sağladık. Bu navigation bar, gerçek bir UINavigationBar object değildir, simulate edilmiş bir UINavigationBar'dır. Simulated metrics ekranın etrafındaki context'e refer eder, bir navigation controller'ın içerisindeyse navigation bar gösterir, bir tab bar controller'ın içerisindeyse tab bar gösterir. )
The new controllers are currently square shaped. When you embed them inside the Tab Bar Controller as you will in a moment, they will change their simulated size to match the parent scenes. ( Canvas'a eklediğimiz 2 yeni controller yani table view controller ve navigation controller'ın şekli karedir. Birazdan bunları Tab Bar controller'ın içine gömeceğiz işte o zaman bunları şekli otomatik olarak parent scene'in şeklini alacak yani tab bar controller'ın şekli gibi olacaktır. )
To connect these two new scenes to the Tab Bar Controller, ctrl-drag from the Tab Bar Controller to the Navigation Controller. When you let go, a small popup menu appears. Click the Relationship Segue –> view controllers option: ( Bu 2 scene'i yani table view controller ve navigation controller'ı, Tab Bar Controller'ın bağlamak(Tab Bar Controller'ın içine gömmek) için, Ctrl basılı tutup imleci Tab Bar Controller'dan Navigation controller'a taşırız -> Tıklamayı bıraktığımızda, bir pop menü çıkar ekranda. Bu pop-up menüden Relationship Segue başlığı altındaki view controllers'a tıklarız -> navigation controller'ın size'ı tab bar controller ile aynı olur. )

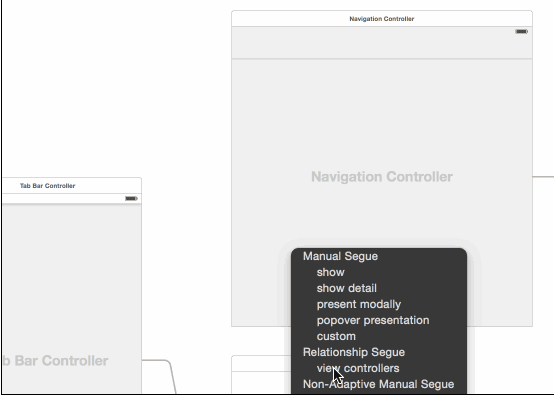

This creates a new relationship arrow between the two scenes. This is also an embed Relationship as you saw with the other controllers contained by the Tab Bar Controller. ( Yukarıda, 2 scene(ekran) arasında bir relationship yarattık. Bu bir embed relationship'dir. Tıpkı daha önce gördüğümüz tab bar controller ve 2 view controller gibi. )
The Tab Bar Controller has two embed relationships, one for each tab. The Navigation Controller itself has an embed Relationship with the Table View Controller. ( tab bar controller 2 tane embed relationship'e sahiptir, birincisi navigation controller ile embed ilişkisi vardır, ikincisi başka bir view controller ile embed ilişkisi vardır. Ayrıca Navigation Controller ve Table view controller'ın da embed ilişkisi vardır. )
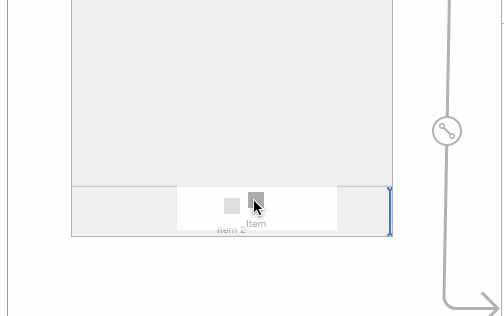
When you made this new connection, a new tab was added to the Tab Bar Controller, simply named “Item”. For this app, you want this new scene to be the first tab, so drag the tabs around to change their order: (Yukarıda anlattığımız şekilde Tab Bar Controller'ı navigation controller'ın içine gömdüğümüzde, tab bar controller'da item default ismiyle yeni bir tab oluşturmuş oluruz otomatik olarak. Tab'ları tıklayıp sürükleyerek tab'ların sırasını değiştirebiliriz. )
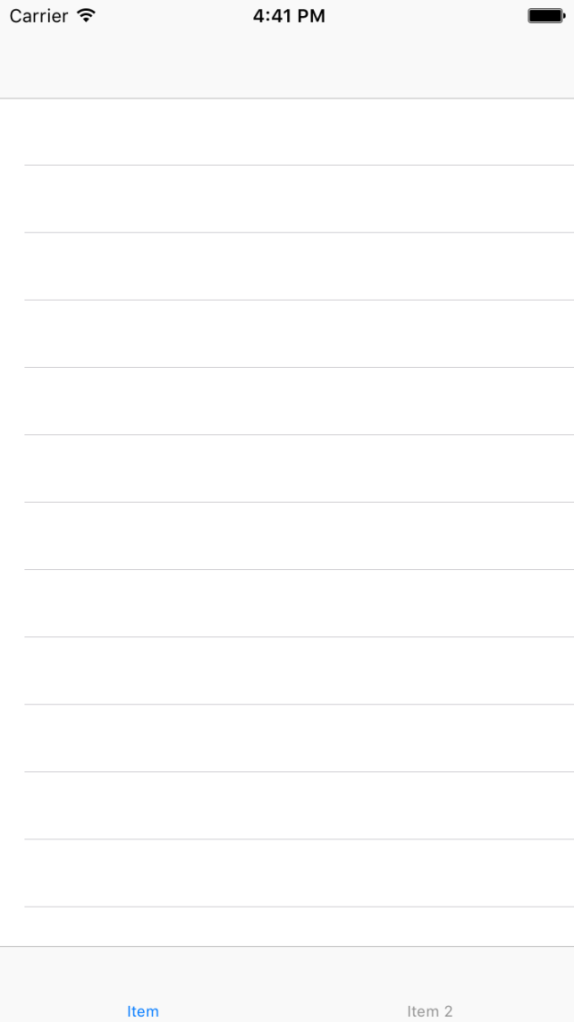
Run the app and try it out. The first tab now contains a table view inside a navigation controller. ( Uygulamamızı çalıştırdığımızda aşağıdaki ekranı görürüz. 1.tab'da artık navigation controller ve onun içerisinde bir table view içermektedir.)
Hiç yorum yok:
Yorum Gönder