Uygulama başlatıldığında load edilecek olan storyboard kimdir ve nasıl değiştirilir ?
The secret is in the Info.plist file. Click on Info.plist in the Project Navigator and you’ll see this: ( Project Navigator'da görülen Info.plist dosyasına tıklayalım : )


Storyboard apps use the key UIMainStoryboardFile, also known as “Main storyboard file base name”, to specify the name of the storyboard that must be loaded when the app starts. When this setting is present, UIApplication will load the named storyboard file, automatically instantiate the “Initial View Controller” from that storyboard, and then put that controller’s view into a new UIWindow object.
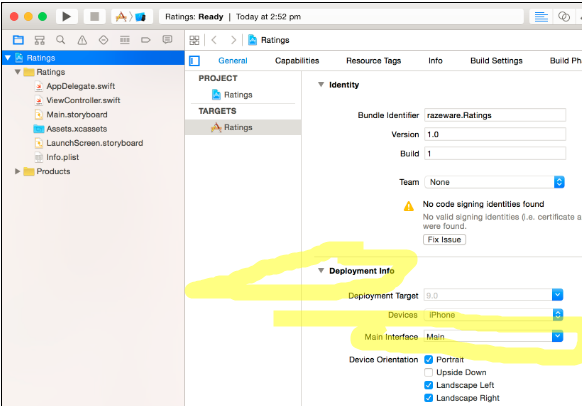
You can also see this in the Project Settings under the General tab and Deployment Info section: ( Yukarıdaki screenshot'da kırmızı ile çevirdiğimiz yere dikkat. Burada, uygulama başlatıldığında hangi storyboard'un load edileceğini belirleriz. Bu örnekte, uygulama başlatıldığında Main isimli storyboard'un load edilmesini söyledik. Bu ayar bu şekildeyse, UIApplication info.plist dosyasında belirlediğimiz main storyboard file base name'i, yani Main.storyboard'u otomatik olarak load eder, sonra bu storyboard'daki initial view controller'dan bir object yaratır ve bu object'i UIWindow object'e koyar.
Uygulama başlatıldığında hangi storyboard'un load edileceğini info.plist'den görebiliriz dedik, bunu başka bir yerden daha görebiliriz. Project Navigator'da uygulama ismine tıklarız -> General tab'a tıklarız -> Deployment Info section'ı altına bakalım -> Main Interface başlığı altında, uygulama başladığında load edilecek storyboard'un ismi yazmaktadır. Eğer farklı bir storyboard kullanacak olursak, buradaki ayarı değiştirmeliyiz. )

Resize the scene to simulate an iPhone 6/6s by using Simulated Metrics
Before you get to exploring, resize the scene to simulate an iPhone 6/6s. ( Uygulamamızın iPhone 6/6s 'de nasıl görünceğini görmek için ekranı iphone 6/6s'in ekranı olarak ayarlayacağız. )
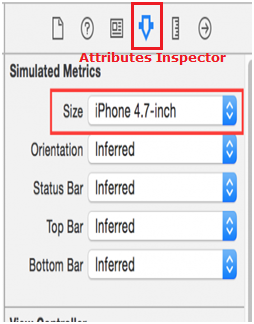
Select View Controller in the Document Outline. If you don’t see a Document Outline, click this button at the bottom left of the storyboard canvas: ( Document Outline'da, View Controller'a tıklarız. Document Outline, XCode ekranında görülmüyorsa, üstteki ve alttaki screenshot'da görülen butona tıklayarak Document outline'ı açabiliriz : )

In the Attributes Inspector under Simulated Metrics, change Size to iPhone 4.7 inch. ( Document Outline'da, View Controller'a tıklamıştık. Sonra sağda görülen Attributes Inspector'ın altındaki Simulated Metrics bağlığı altında, size'ı iPhone 4.7 incholarak set ederiz. )
The scene in the storyboard will now show as the size of the iPhone 6 or 6s, which are 4.7 inch iPhones. ( Artık, storyboard'daki scene(ekran), iPhone 6/6s ekranının size'ı ile aynı yani 4.7 inch olacaktır. iPhone 6 /6s ekranında uygulamamız burada görüldüğü giib görünecektir. )
Hiç yorum yok:
Yorum Gönder