Storyboards Tutorial in iOS 9: Part 1
Storyboards are an exciting feature first introduced way back in iOS 5 that save you a lot of time building user interfaces for your apps.
To show you what a storyboard is, I’ll let a picture do the talking. This is the storyboard that you will be building in this tutorial: ( Bu derste, storyboard'u aşağıdaki gibi olan bir uygulama geliştireceğiz: )
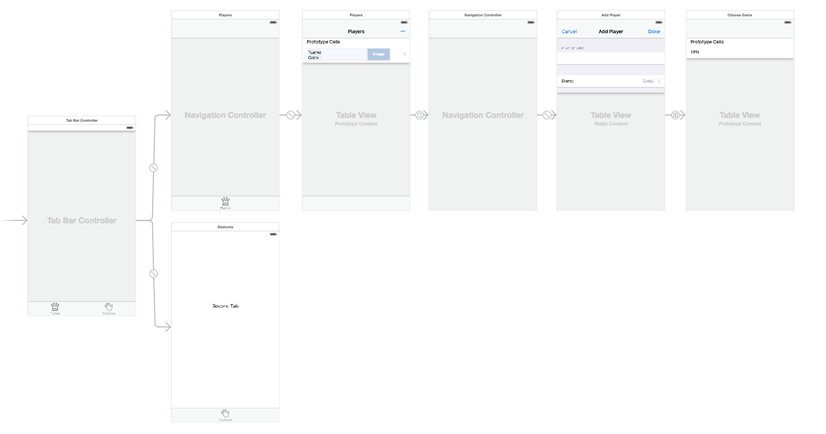
You may not know exactly yet what the app does but you can clearly see which scenes it has and how they are related. ( Yukarıdaki storyboard'a bakınca, yapacağımız uygulamanın ekranlarını ve hangi ekranlardan hangi ekranlara geçiş yapılabileceğini görürüz. )
Storyboards have a number of advantages:
- You can visually lay out all your view controllers in “scenes” and describe the connections between them. With a storyboard you have a better conceptual overview of all the scenes in your app. (Storyboard'lar, Uygulamadaki tüm ekranları gösterir. Scene ve view controller interchangably kullanılabilir, ikisi de aynı veya benzer şeyler giibi düşün. )
- Storyboards can describe the transitions between the various scenes. These transitions are called “segues” and you create them by connecting your view controllers right in the storyboard. Thanks to segues you need less code to take care of your UI. ( Storyboard'lar, farklı scene'ler arasındaki geçiş'leri(transition, segue) gösterir. )
- Storyboards make working with table views a lot easier with prototype cells and static cells features. You can design your table views almost completely in the storyboard editor, cutting down on the amount of code you have to write. (Storyboard'un sağladığı prototype cells ve static cells özellikleri sayesinde, table view geliştirmek çok kolaydır. Table'ımızın neredeyse tamamını storyboard editor'de geliştirebiliriz. Bu işi herhangi bir kod yazmadan yapabilmek büyük avantajdır. )
- Storyboards make it easier to use Auto Layout, a feature that allows you to define mathematical relationships between elements that define their position and sizing. This powerful feature makes it much easier to handle devices of varying screen sizes and dimensions. In this tutorial you will use Auto Layout a little, but it is outside the scope of this tutorial. You can read more about it in our Auto Layout Tutorial or watch the video series. ( Storyboard, Auto Layout kullanını kolaylaştırır. Auto Layout özelliği, farklı cihazlarda bu uygulama açıldığında, view element'lerin pozisyonunu ve size'ını otomatik olarak ayarlar. Detay için linki okuyabilirsiniz. )
In this storyboards tutorial you’re going to build a simple app that lets you create a list of players and games, and rate their skill levels. In the process, you’ll learn the most common tasks that you’ll be using in storyboards. ( Bu storyboard dersinde geliştireğimiz uygulamada, oyuncu ve oyun listesi göstereceğiz ve oyuncuların yeteneklerine puan vereceğiz(rating). Bu uygulamayı geliştirirken, storyboard'larda en sık kullanılan işleri öğreneceğiz, uygulayacağız. )
Getting Started
Fire up Xcode and create a new project. Use the Single View Application template as the starting point. ( Xcode'u açıp yeni bir proje yaratalım -> template olarak Single View Application kullanalım: )
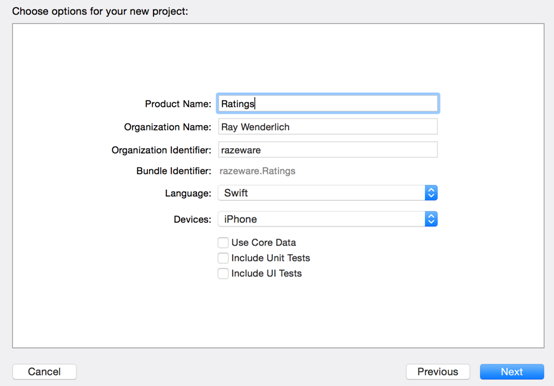
Fill in the template options as follows:
- Product Name: Ratings ( Proje ismi )
- Organization Identifier: the identifier that you use for your apps ( Uygulamalarımız için kullandığımız identifier'ı yazalım. Şuna dikkat et: Bundle identifier = Organization Identifier + Product Name )
- Language: Swift
- Devices: iPhone
- Use Core Data, Include Unit Tests and UI Tests: not checked
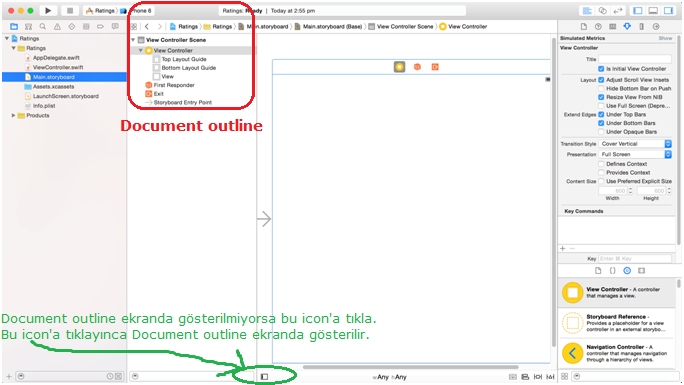
After Xcode has created the project, the main Xcode window looks like this: ( Proje yaratıldıktan sonra, main Xcode penceresi aşağıdaki gibi görünür : )

The new project consists of two classes, AppDelegate and ViewController, and the star of this tutorial: the Main.storyboard file. (Yukarıdaki screenshot'ı incele. Bir proje ilk yaratıldığında aşağıdakileri içerir.:
- AppDelegate
- ViewController
- Main.storyboard )
This is a portrait-only app, so before you continue, uncheck the Landscape Left and Landscape Right options under Deployment Info > Device Orientation seen in the General project settings shown above. ( Bu uygulama sadece portrait orientation'da gösterilecektir. Dolayısıyla yukarıdaki screenshot'daki, Deployment Info altındaki Device orientation seçeneğindeki, Landscape Left ve Landscapte Right checkbox'larındaki tick'i kaldıralım. )
Let’s take a look at that storyboard. Click Main.storyboard in the project navigator to open it in the Interface Builder editor: ( Project navigator'da görülen Main.storyboard dosyasına tıklayınca storyboard dosyamız interface builder'da açılır. Interface builder'da görülen scene(view controller) bir canvas'dır, bu canvas'a view element taşıyabiliriz. )
The official storyboard terminology for a view controller is “scene”, but you can use the terms interchangeably. The scene is what represents a view controller in the storyboard. ( Storyboard'da gösterilen bir view controller'a scene denir. Ancak biz scene ve view controller kelimelerini birbirleri yerine kullanabiliriz. )
Here you see a single view controller containing an empty view. The arrow pointing at the view controller from the left indicates that it is the initial view controller to be displayed for this storyboard. ( Yukarıdaki screenshot'da single bir view controller görülmektedir. View controller'ın solundaki ok, storyboard'da gösterilecek ilk view controller'ın bu olduğunu gösterir. )
Designing a layout in the storyboard editor is done by dragging controls from the Object Library (see bottom-right corner) into your view controller. You’ll see how easy that is in just a moment. ( Sağ alttaki Object Library'den view view element'leri taşıyarak storyboard editor'de layout dizayn edebiliriz. Layout dizayn etmek çok çok kolaydır. )
Before you get to exploring, resize the scene to simulate an iPhone 6/6s. ( Uygulamamızın iPhone 6/6s 'de nasıl görünceğini görmek için ekranı iphone 6/6s'in ekranı olarak ayarlayacağız. )
Select View Controller in the Document Outline. If you don’t see a Document Outline, click this button at the bottom left of the storyboard canvas: ( Document Outline'da, View Controller'a tıklarız. Document Outline XCode ekranında görülmüyorsa, üstteki ve alttaki screenshot'da görülen butona tıklayarak Document outline'ı açabiliriz : )

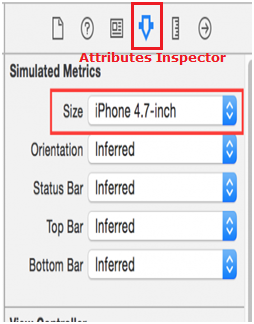
In the Attributes Inspector under Simulated Metrics, change Size to iPhone 4.7 inch. ( Document Outline'da, View Controller'a tıklamıştık. Sonra sağda görülen Attributes Inspector'ın altındaki Simulated Metrics bağlığı altında, size'ı iPhone 4.7 incholarak set ederiz. )
The scene in the storyboard will now show as the size of the iPhone 6 or 6s, which are 4.7 inch iPhones. ( Artık, storyboard'daki scene(ekran), iPhone 6/6s ekranının size'ı ile aynı yani 4.7 inch olacaktır. iPhone 6 /6s ekranında uygulamamız burada görüldüğü giib görünecektir. )
Hiç yorum yok:
Yorum Gönder